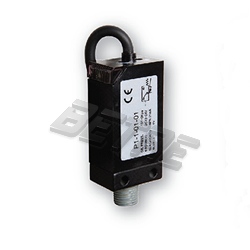
High-Precision Digital Pressure Switch Series BC-P-1

High-Precision Digital Pressure Switch Series BC-P-1
High-Precision Digital Pressure Switch BC-P-1 Series
Features
● 1 output(hysteresis adjustable 2 outputs
● Easy installation
● Fast respone:5ms
Features Highlight
Hysteresis adjustable
.png)
Installation Precautions
●When mounting, always use the wrench on the metallic area near the pressure port.Never apply a wrench to the plastic body, it will damage the sensor.
●Over tightening may cause damage to the port thread, mounting bracket and pressure sensor. Under tightening may result loosen or leakage.
●Apply pressure and power after installation and make necessary adjustments and inspect any possible signs of leakage to ensure proper in stallation.
.png)
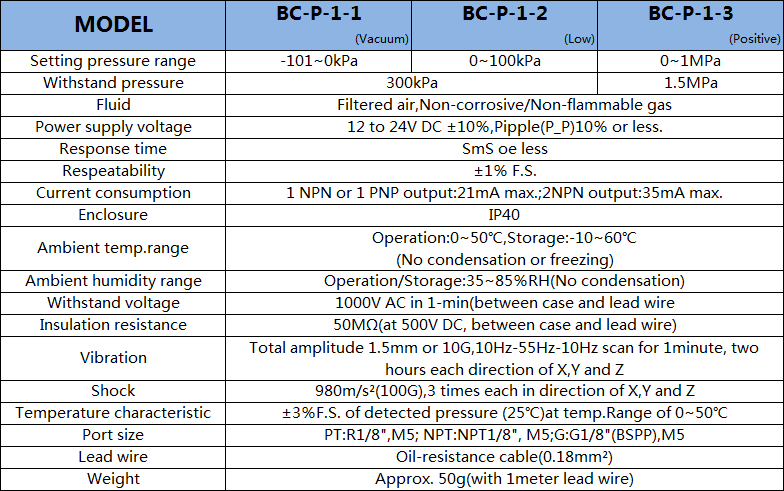
Specifications

Circuit Wiring Diagrams

Ordering Information
.png)
How To Set Pressure
BCP1-□-01,02
●Remove dust cover to make any adjustments.Replace dust cover when finished to prevent foreign object from entering.
●Pressure setting trimmer(SET) is for setting the output(ON)pressure. Rotate SET trimmer counter-clockwise to increase (Pressure or Vacuum)the ON point.Rotate clockwise will decrease the setting pressure.
●Hysteresis setting trimmer(HYS)is for changing the hysteresis.Rotate trimmer counter-clockwise to increase the range 1~10%.
●Use appropriate size screwdriver for the setting trimmers.Gently turn the screwdriver to make adjustments.Do not force the trimmer when it comes to a stop to prevent damage to the setting trimmer.

BCP1-□-03
●Remove dust cover to make any adjustments. Replace dust cover when finished to prevent foreign object from entering.
●Pressure setting trimmer(SET) is for setting the output(ON)pressure. Rotate SET trimmer counter-clockwise to increase (Pressure or Vacuum)the ON point.Rotate clockwise will decrease the setting pressure.
●Hysteresis for models with two outputs is 3% fixed.

Dimension


Features
● 1 output(hysteresis adjustable 2 outputs
● Easy installation
● Fast respone:5ms
Features Highlight
Hysteresis adjustable
.png)
Installation Precautions
●When mounting, always use the wrench on the metallic area near the pressure port.Never apply a wrench to the plastic body, it will damage the sensor.
●Over tightening may cause damage to the port thread, mounting bracket and pressure sensor. Under tightening may result loosen or leakage.
●Apply pressure and power after installation and make necessary adjustments and inspect any possible signs of leakage to ensure proper in stallation.
.png)
Specifications

Circuit Wiring Diagrams

Ordering Information
.png)
How To Set Pressure
BCP1-□-01,02
●Remove dust cover to make any adjustments.Replace dust cover when finished to prevent foreign object from entering.
●Pressure setting trimmer(SET) is for setting the output(ON)pressure. Rotate SET trimmer counter-clockwise to increase (Pressure or Vacuum)the ON point.Rotate clockwise will decrease the setting pressure.
●Hysteresis setting trimmer(HYS)is for changing the hysteresis.Rotate trimmer counter-clockwise to increase the range 1~10%.
●Use appropriate size screwdriver for the setting trimmers.Gently turn the screwdriver to make adjustments.Do not force the trimmer when it comes to a stop to prevent damage to the setting trimmer.

BCP1-□-03
●Remove dust cover to make any adjustments. Replace dust cover when finished to prevent foreign object from entering.
●Pressure setting trimmer(SET) is for setting the output(ON)pressure. Rotate SET trimmer counter-clockwise to increase (Pressure or Vacuum)the ON point.Rotate clockwise will decrease the setting pressure.
●Hysteresis for models with two outputs is 3% fixed.

Dimension


